Sunday, November 8, 2020

A Forever Memory

Last week I started searching bedroom closets for a very specific princess dress I made years ago. I was scared I donated it during one of my erratic cleaning moods. BUT I found it in a box I must have had sense to save.  This is the very first princess dress I made for my oldest daughter, Emily.   It's wrinkled and stained and the sewing is far from perfect. The colors are what her favorites were at the time. What I remember most is her tiny 3 year old arms popping through the sleeves for the first time and her running down the hallway with the back unzipped, giggling a giggle that will be a forever memory. For that reason, this dress is perfect in every way.

Emily's First Princess Dress


I've been struggling with how to start this post and finding her dress has helped me. It's been over 20 years since I made this dress.

About 18 months ago, she asked me if I would make her wedding dress. And so that is what we did.

She tried on a few dresses in a few different bridal shops over the course of a few months until she found what she really liked.  Actually, she found two dresses she liked.  We left the bridal shop with pictures of both inspiration dresses.


Inspiration Dress #1 (left) and #2 (right)


Inspiration Dress #1: She liked the front and back bodice and the lace appliques.


Inspiration Dress #2:  She thought she liked the waistline but wasn't ready to make a decision so we took a picture knowing we could play during the pattern stage.


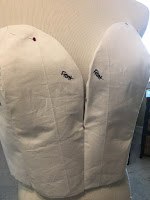
Muslin Pattern - 

Starting with the bodice - the front is fabric (muslin now, satin later) with a sheer overlay. The back is all sheer.  


Originally, my sweet daughter wanted a very long train so that's where we started.


The pattern phase is the time to try out ideas of what you think you'd like - no matter how extreme they may seem. My advise is to not hold back during this stage because this is the time to try out your ideas.  It's so much easier and less costly to make changes during the pattern phase than it is during the dress making phase. 

After trying on the pattern, my daughter didn't want the train quite so long so we trimmed some length.


Fabrics -

I knew I wanted to use dress satin for the front bodice and skirt base or underlay, cotton batiste for the interlining of the bodice front, dress tulle for the skirt and bodice overlay and rayon for lining because of how soft it feels. We ordered all of the dress fabrics from VogueFabrics.com:

Dress Skirt & Front Bodice: 
https://www.voguefabricsstore.com/mystique-satin-ultra-white.html

Tulle Overlay, Skirt, Bodice (Front/Back): 
https://www.voguefabricsstore.com/wholesale-dress-tulle-nt52-white-25-yards.html

Bodice Interlining:
https://www.voguefabricsstore.com/combed-cotton-batiste-white.html

Bodice & Skirt Lining:
https://www.voguefabricsstore.com/ambiance-lining-super-white-121.html?category_id=3426


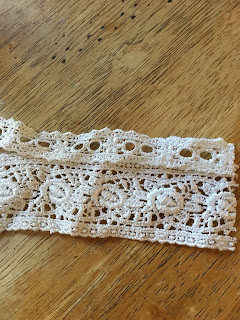
With those on order, we started searching for the lace that was going to be between the satin and tulle on both the skirt and front bodice and the appliques that were going to be added to the entire bodice and upper part of the skirt.


We found the lace and appliques along with the stretch looping & satin buttons at a few different shops on Etsy:

Chantilly lace from FabricTrims.com:


Lace appliques from LaceBeauty.com:


Elastic looping from NapunarWedding.com: 


Satin buttons from JL Weddings.com:


And trim from JoAnn Fabrics that was similar to the waistline of Inspiration Dress #2:


At this point, everything was ordered and we had samples of trim to try with the muslin pattern.  We played around with the trim for the waistline and in the end, Emily decided she didn't want it added to the waistline or skirt.  She really liked the look of Inspiration Dress #1.

Thank you for coming along with me on this journey so far.  What might seem like mundane points have special meaning to me, this is more of a journal entry, a way to document this very special moment. Another forever memory as her mom and not just as a seamstress.  

My next post will show how her dress came together. 


Friday, October 23, 2020

When More is Better

For this dress, the bride asked me to create as much fullness in the skirt as I possibly could.  I started with the idea of making a hoop skirt.  How hard could that be? It turned out to be harder than I thought.  I really needed this part, the starting point, to be easy and when it was proving to be just the opposite, I paused. During my pause, someone gave me great advice that I will carry with me - “It’s okay to outsource parts of a project when you need to.” It’s not failure, it’s just knowing when you don’t know enough.

I do wish I had a picture of my crazy wavy hoop skirt - but I don’t :). It was everything I didn’t need it to be.

I ordered a 6- hoop skirt with a circumference of 160” from Angels Bridal Shops on Etsy.    

With the hoop skirt on order, I started playing around with just how full I could make the skirt. I marked out where the edge of the skirt would hit - measuring approximately 3 feet from the original skirt hem, in all directions. I marked the new skirt edge with blue painters tape:


The hoop arrived and I tried it with the dress. It definitely added fullness but was it enough?

Not quite. The level of fullness we were trying to get to was more like fairytale princess fullness! Now I had a picture of where we were headed.

Inspiration Dress

Two layers of crinoline were hand stitched to the hoop skirt:


The layers of crinoline really made a difference. 


The bride wanted some sparkle added to the skirt layers. A layer of sparkle organza was added just under the layers of tulle.


Sparkle Organza

Added layer of sparkle organza

This is how the skirt sparkled outside
Pockets added


Bodice Work 

The zipper was removed and replaced with a corset tie up back - loops, tie and modesty panel all made with fabric that came very close to matching the original dress. It is always a challenge finding fabric to add to a dress - matching color and shade. I think we came very close.

Lacing up the corset

Adding thread loop to hold tulle skirt together
at bottom of corset
Hook attached to loop

This is what I was hoping the hook
and loop would do 

Additional support - Steel boning was added to give more support and structure to the bodice.  I added casing over the existing plastic boning and slid steel boning into each casing. I also added 2 inch wide horsehair braid - I’ve done this in past along the inside top edge of a bodice but wanted to add some stability across the middle of the bodice. There was no stabilizer or interlining in the dress, adding horsehair braid across the middle of the bodice from side seam to side seam helped.
Adding casing over existing boning

Measuring steel boning

Cutting the boning

Inserting the boning into the casing
Everything back in place - right side
Everything in place,
including modesty panel - left side

 
If you’re wondering why I chose to use this boning instead of spiral- I don’t really have a reason other than inexperience.   I’ve always used plastic boning and was very unsure of the spiral, and didn’t have time to play so I went with what behaved similar to plastic boning.  Since working on this dress I have used spiral boning and prefer that because of it’s flexibility - love it!


Thank you to this beautiful bride for asking me to add some “fairytale magic” to her dress. 


Friday, August 14, 2020

A Lesson in Layering


My takeaway from this dress is to not be afraid of trying new combinations of colors -  just because you can't find the color you're looking for does not mean you can't create it.  Sure there's dye but I'm talking about a different approach - Layering.   I've never looked at fabrics this way - sure I've layered fabrics, countless times but never with the intent to match color the way I needed to with this dress.

Typically, after a decision on color has been made, fabric is picked for the dress base with a coordinating overlay.. simple, done.  For this dress, it was little more complicated. This dress needed to match or come close to matching another dress. A color combination was found but was out of stock and was not going to be back in stock for some time.  This was when I started playing around with the fabrics I could order to see if there was a combination of two that would come close to matching the color.  For this dress, a combination of three shades of blush was the magic mix.


Construction:
At the first appointment we looked through pictures of dresses found online, discussed design and the likes and dislikes of each.  Pictured below is the dress that would be the inspiration for her dress:


Inspiration Dress

 
The dress came together beautifully.  There were a few changes that differed from the inspiration dress - the bodice and the sleeve cuffs.  


To keep the dress in place, a waist stay was stitched to the inside.  A waist stay works just like a belt, keeping the bodice from slipping. I like installing them in off the shoulder dresses because there isn't much help to hold the dress up along the shoulder area, even with added boning, a waist stay gives additional support, keeping everything in place. 


Here's a closer look at how I layered the three fabrics -the bodice was layered the same way.

Base layer skirt - Rosewater Sanded Satin
https://www.joann.com/casa-collection-sanded-satin-fabric--rosewater/15080252.html

If you haven't felt "sanded satin", you need to.  It's my new favorite and was just right for this dress - it's lightweight and drapes beautifully.

Underlay - Blush Pink Chiffon
https://www.voguefabricsstore.com/chiffon-solid-60-blush-pink.html

Overlay - Rosewater Chiffon
https://www.joann.com/casa-collection-chiffon-many-colors/zprd_08528820a.html

I learned a lot making this dress and am thankful to have had the opportunity especially during this past year as we all adjusted to a new normal.  There were some hiccups along the way due to the pandemic - finding places not shut down to order fabric, figuring out ways to safely do in person fittings and a postponed May wedding to August.  


Thank you Nicole for asking me to make your dress!

Monday, August 10, 2020

A Special Kind Of Alteration

Recently, a mom I know was diagnosed with breast cancer and had to have a double mastectomy. I wasn't sure how I could help and thought if she ever needed anything altered to fit, I could do that for her.

This past spring, I received a text from her asking if I could help alter a dress she bought for her son's wedding. I couldn't tell her yes fast enough.

We met and started talking about her dress:

The dress was fitted through the bodice and hip, slightly flaring through the skirt line ending with somewhat of a train. The dress had an open back that came together in the center attaching with one button.

She did not like how the dress sat across the top of her shoulders and neck. The neckline was similar to a boat neck (but only across the front) - sitting above her collar bone, it went straight across shoulder to shoulder. She wanted a more rounded neckline, sitting just below her collar bone.  

I gently pulled the neckline down to the point she felt most comfortable. In doing so, it changed the back of the dress. There was now a 5" space between the loop and the button, pictured below:

Button and loop closure on back of dress

This space needed to stay 5" in order for the front neckline to stay in its new lower position - which was only about an inch lower than the original neckline.

First back extender made with dress fabric

To do this, I made an extender using fabric from the train of the skirt. It turned out how I thought I wanted it to until she tried it on - I wasn't sure I liked it or not. I felt the dress needed something different, some kind of detail, embellishment, something. I wasn't sure what until I found 1" wide sparkle/glitter grey elastic trim. 

I attached the trim to the lining of the dress - one side sewn, the other was attached with a button sewn to the inside of the dress and a button hole sewn in the elastic. 

Grey sparkle/glitter elastic extender

The strap looked good but again, missing something. I stopped here to think about the back while I started work on the front.

The front of the dress had two side darts that shaped the dress. Because of the open back, there was no easy or comfortable way to wear an undergarment without it showing from behind.

Before doing anything, I put the dress on my dress form backwards so the front of the dress was on the back of the form. By doing this, the dress fit similarly to the way it did on Beth and I was able to see where I needed to place the cups. My goal was to position the cups to give just enough shape to smooth out any lines or folds in the fabric created by the darts.

Using foam bra cups, I started by pinning one set in place then decided to add a second set. 

First set of cups pinned in place

Positioning second set of cups


Foam cups pinned in place, ready to be fitted


After checking placement, the cups were sewn to
the inside of lining.

The dress was nearly finished, I was still playing with the back extension strap trying to find something to add that would cover a few exposed stitches.  I decided on buttons.


Decorative buttons added to hide exposed stitches


One last thing - we added a wrap.  I used a lightweight sheer knit:

https://www.joann.com/metallics-knit-fabric--silver-and-white/14261655.html

The button used to close the wrap is the original button
from the back of the dress
Cold shoulder opening along each side seam

Sheer to show the back detail


I met Beth a few years ago when our kids were in high school marching band together. We were part of the parent group that dressed the kids, chaperoned the kids, fed the kids and did anything else that needed to be done to get those kids on the field performing. Some of my fondest memories being a part of that parent group include her. 


Thank you Beth for trusting me with your dress.  You are stunning!